In javascript often you create a class or widget that can take a parameter as a literal
value (string, number, etc.) or as a function that returns a string.
For example if you are creating a widget that can take a url parameter it would
look like:
1234567891011121314
// Configuring property with a string$('#myid').magicwidget({url:'/some-url'});// Configuring property as a function$('#myid').magicwidget({url:function(){if(this.isNew()==true){return'/special-url';}return'/normal-url'}});
This is a pretty common behaviour and many Backbone properties can be
configured this way.
Now, to retreive the value you can check if it’s a function or a string and handle it
manually but this is such a common thing there’s an underscore method for that.
Inside the widget code whenever we need the url value we can call _.result
to return it:
123
// The first argument is the context object and the second is the name of the// property. url=_.result(this,'url')
This means we don’t have to check ourselves if the url was a
function or a string - we let underscore do that.
This little utility method is awesome
and Backbone uses it all over the place (a quick search of the codebase shows that
it’s used 12 times). It’s also a great way to make your
client-side framework APIs flexible.
_.result() is now my new favourite underscore method.
I’ve been working with Backbone pretty heavily over the last year with
Handlebars being used as the templating
engine.
For every project I usually end up adding a few helpers to Handlebars
to aid in debugging. One of my favourites, and yet the simplest, is a helper to output
an object (usually the model) to json inside the template.
The helper itself is super simple but very useful for debugging:
You would use this in any Handlebars view like so:
123456789
<div><!-- This will output the model to JSON --><div>{{json this}}</div><!-- This will output the json further down the object graph --><div>{{json owner.followers}}</div></div>
This is not something new.
Rendr (from Airbnb)
has this helper baked right in (although they escape the string, which is a
good idea) - and I’m sure other frameworks have it or
something similar.
Anyway, I hope this helps someone starting out a new backbone/handlebars
project or even for debugging an existing one!
Sometimes you are debugging an issue using the Chrome developer tools and you are
happily executing some statements in the console to make sure everything is
where it should be.
Once in a while you might try to get an element that you know is being
rendered but the selector returns nothing:
1
varel=$('#name');// Returns []
However you can see that the element exists on the page and inspecting via the elements tab
(CTRL+SHIFT+C) shows that it does in fact have the expected id. Strange.
Scratching your head you notice that this element belongs to an iFrame.
Luckily Chrome always seems to have our back in situations like this.
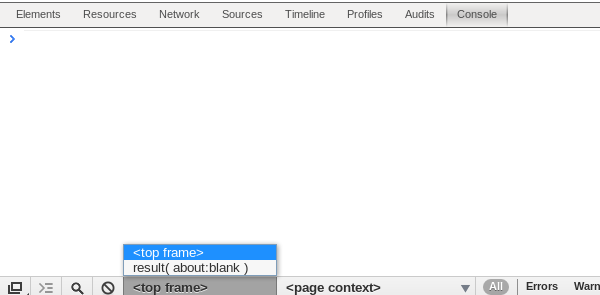
Chrome actually has an option to set which iFrame the console is currently
evaluated against. If you go to the console tab at the bottom you’ll
see a dropdown named top frame:
Changing it to the iFrame you want to debug against will allow you to access all the
dom elements in the console as needed!
Bonus
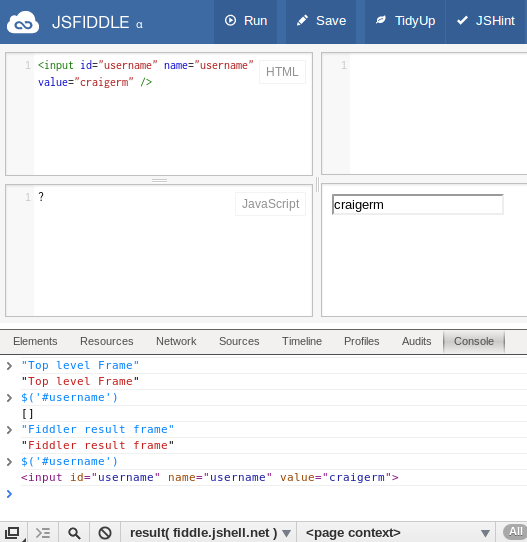
Sometimes someone will send you a code sample via jsFiddle (or maybe you are
investigating a stack overflow question). Since the code is run in an iFrame
you’ll need to change the console’s frame in order to interact with the
elements that were rendered via the fiddle.
You can see in this trivial example that I can’t get the username element
unless I switch the frame:
There are so many awesome options buried in the Chrome developer tools. Some of them
you will rarely use, but when you need them you’ll be glad they’re there!
One of my first jobs in software was building an enterprisey SaaS product.
I joined a team of about 10 people that was pretty evenly distributed between
Junior and Senior developers.
One of the first bugs I got assigned was to update the copyright year in the
footer of the application. Easy enough. I got familiar with the file structure (it
was a pretty hefty app!) and found the footer ASP page that I needed to change.
I noticed that the copyright was using a static year like so:
1
<strong>Copyright 2005</strong>
I found that strange since if I
just simply replaced the year we would have to go through this again next year.
Thus creating the dreadful, perpetual bug.
(Maybe there could be some value in having this recurring bug for new developers to get familiar
with the code base or see if they really fix the issue, but this was definitely not the case here.)
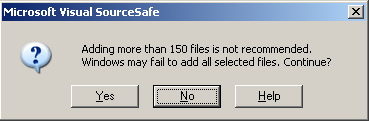
I decided to check out the logs in Visual Source Safe
to see what was going on (which was the worst!).
I found out that every year someone manually updated the copyright date! This
was going on for over 5 years. This meant someone (QA, client, etc.) reported
and filed the bug, someone else prioritized it, a developer “fixed” it, and it
was tested and released.
I use the term fixed lightly here. For a company that was limited on
resources there sure was a lot of waste.
So I changed the footer to show the date based on the current year and this bug never
came back.
This is a simple example but these are the decisions that are made by
software(web) developers (programmers/engineers/etc.) on a daily basis.
Of course you don’t want to to over engineer something as we all know. But in some cases
it’s more time consuming to not use the best approach available.
This is one of the differences between a problem solver and a programmer.
Looking beyond the code to the see what effects flipping of a bit will have over time.
I would hire a Junior problem-solver over a Senior programmer any day of the
week.
As developers we are constantly throwing together forms so user’s can enter
data. It’s a fairly common task but because of this frequency we can forget to
ask ourselves why when it comes to the decisions we have to make.
Something as simple as which fields are mandatory can impact the user experience in a negative way
if the different options are not considered.
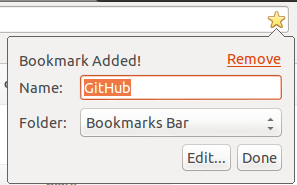
Take Chrome’s add bookmark form for example.
When you click the star in the address bar to bring up the dialog you are
presented a form with two inputs: name and folder.
All too often a developer would decide that both inputs should be mandatory.
Usually this would be fine since “Name” is probably mandatory 90% of the time.
Blindly making something mandatory can have negative effects on the user
experience. If this field was mandatory it would limit the real estate space on the Chrome
bookmark bar - thus limiting it’s usefulness.
Since Google is great at building awesome user first interfaces (UFIs?) they took the
time to make the decision that name can be optional.
As a result you can have icons without names on your bookmark bar.
Since most websites have favicons we can get more bookmarks on our toolbar than
we could of with names beside the icons:
Since most users are familiar with app icons (via smartphones or whatever) our
bookmark bar now looks like an app bar. Which is both intuitive and easy on the
eyes.
So remember this rule:
If you are forcing a user to take an action you should
first ask yourself why and consider what impact this will have on the overall user experience.
I’ve been experimenting with a few HTML5 features lately including localStorage in a backbone app.
While localStorage is not technically part of HTML5 usually people group it
together with HTML5 so I’ll do the same here.
If you’re not familiar with localStorage there’s a good introductory post
here (also discusses
sessionStorage).
Limitation
One small limitation of using local storage is that it can only store strings.
So if you want to store objects or arrays you will need to do some extra work.
For example storing the following object won’t work as expected:
This can get a little annoying if you are storing several different objects in
your app so I would recommend creating a wrapper class to handle the object
(de)serialization.
This allows us to store objects and retrieve them
1234567891011
// Create an instance of our storage wrappervarstorage=newStorageWrapper();// Add the object to our storagestorage.set('item',{price:500,quantity:3});// Retrieve the object from our storagevarobj=storage.get('item');// We can now work with the JSON object expect(obj.price*obj.quantity).toBe(1500);
But what about older browsers?
Of course not all browsers support localStorage.
To see if it is supported in your browser (You are using a modern browser
right?) check out html5test.com.
Instead of changing the wrapper class to check if local storage exists (since
that’s not the responsibility of the wrapper) it would
be better to use an HTML5 polyfill for this.
I would recommend using a Modernizr polyfill
to add this feature to older browsers.
Final Thoughts
Local storage is extremely useful for maintaining the state of dynamic web
applications like single page applications or other backbone apps. It’s usually
a good idea to keep things DRY
by adding wrapper classes to any HTML5 feature that
requires you to write extra code when using its API - like storing and
retrieving objects via local storage.
I want to include my email on my blog but I don’t want to store it in plain text - for obvious reasons.
Originally I was going to use a third party script to do this since I couldn’t find an Octopress
plugin that did what I was looking for.
Instead I decided to write my first Octopress plugin.
The plugin allows the following tag in markdown for obfuscating emails:
1
{% email test@example.com %}
This will render a script block that does the following:
Encodes the @ and . characters
Encodes the mailto: prefix
Reverses the email and uses CSS to display it to the user
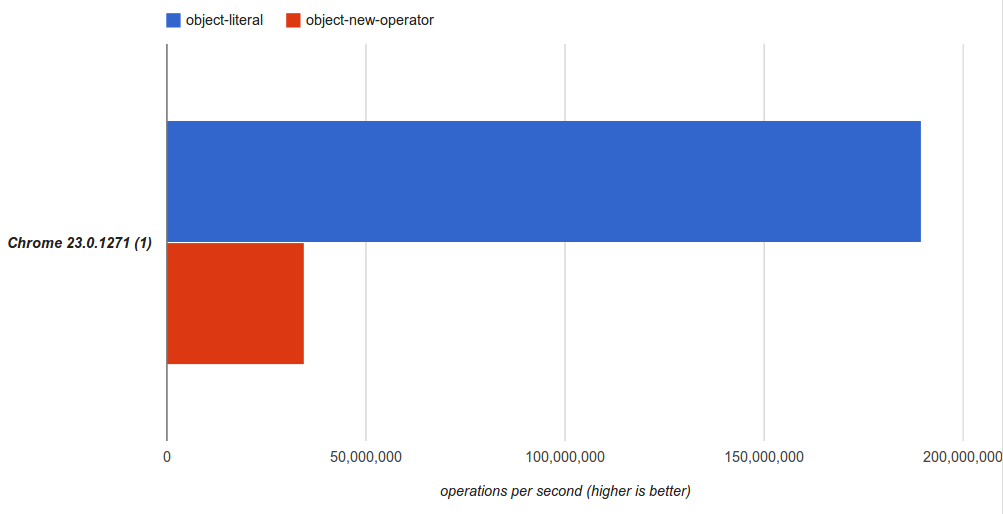
My last post quickly compared the performance
of creating javsacript objects via new object() and {}.
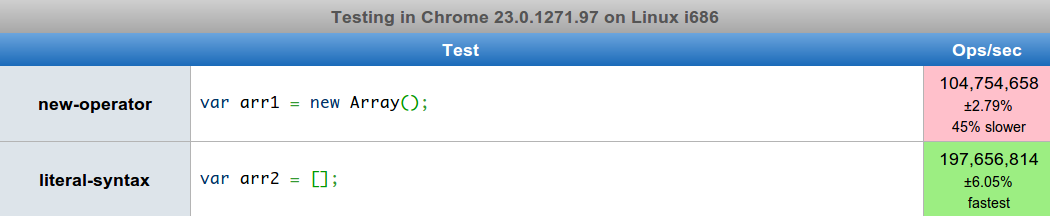
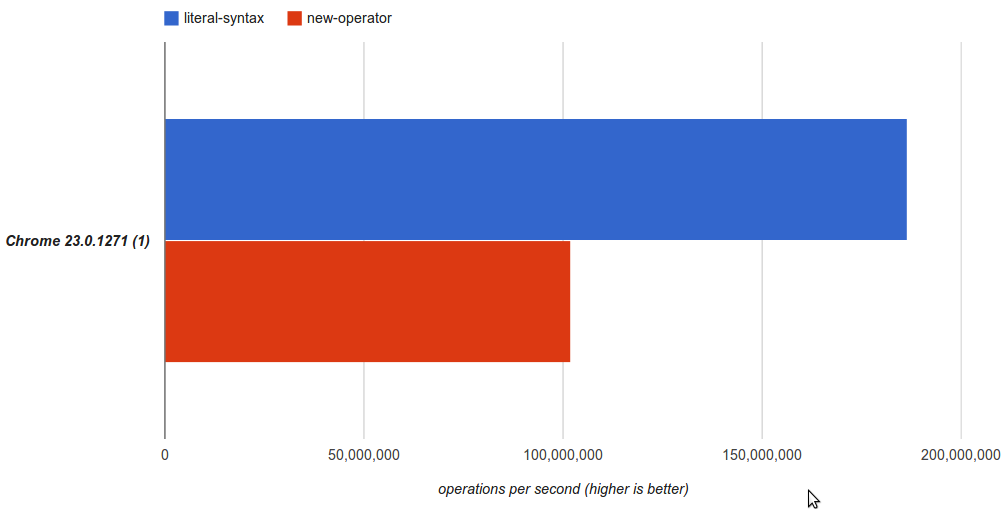
So for curiousity’s sake let’s do the same for arrays.
We’ll compare these two methods for instantiating arrays:
12345
// Method 1: Using new operatorvararr1=newArray();// Method 2: Using literal syntaxvararr2=[];
To no suprise the literal syntax is almost twice as fast.
Unless you need to set the length when creating the array we should favour
the the literal syntax of var a = [] instead of the verbose var a = new Array()
syntax for performance and readability.
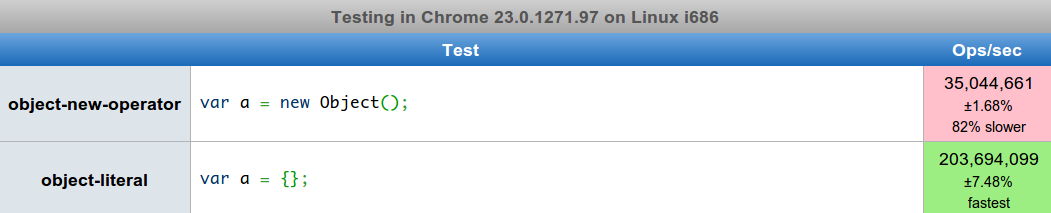
Recently I had a discussion with someone about creating javascript objects.
There are two main ways of doing this:
12345
// Method 1 - Using the new operatorvarobj1=newObject();// Method 2 - Using the literal syntaxvarobj={};
Now, most likely, you use the literal syntax. It is the standard that you will find
out in the wild most of the time. And this is the method I use.
I started using the literal syntax way-back-when to save keystrokes.
At some point I was told that it was faster so I continued to use it.
But I’ve never confirmed that it is actually faster.
So is it really faster or is this just one of those old wise tales?
Let’s ask our dear friend jsperf and see what we can find.
And I’m back :)
Ok, based on using new object() and {} for object instantiation here are the results:
Wow I didn’t think it would be that much of a difference! Clearly the object literal is the way to go
since it’s significantly faster.
I am only testing on the V8 javascript engine so maybe this won’t apply to other browsers.
I tried looking at the V8 source to see if I could’nt quickly find out exactly why this is happening
but with no luck.
My guess is that the constructor call is being executed for new and not for {}
as an optimization trick for V8. When I have a more time I’d like to venture into the V8 source
and see what’s going on. So if I find something I’ll post it here.
From these results we can at least justifiably tell people that {} is not only easier on the eyes
but also easier on the old processor.
So it’s been almost a full year since I started blogging. I only have 6 posts so far which
is a little disappointing. My plan originally was to have a total of 12 by the end of the year.
Oh well c'est la vie. Technically I still have a couple of weeks until it’s been a full year, so
hopefully I can move closer to that number!
My little hosting plan is almost up so instead of renewing it and continuing with Wordpress I decided
to give Octopress a try. I really hated battling the Wordpress RTE
and spent way too much time on formatting instead of content. Sometimes I would decided not to write about something just because there’s so much effort spent on the non “fun” stuff.
Since I really, really, love Markdown I decided to move to Octopress mainly because of this and the fact that I can host on github for free! Thank you github!
My wordpress site will still be up until the end of January and I will move my domain
allthingscraig.com to point to this new octopress blog sometime over the next few weeks.
Moving from Wordpress to Octopress was very quick and painless - granted I did only have 6 posts to migrate.
If you are planning on doing this I recommend this blog post.
Special thanks to Thomas Frössman for creating exitwp
which took me all of 5 minutes to install and migrate my posts to Octopress format.
This transition is still a work in progress since there is still lots left to do such as:
adding comments
adding a spell checker (Hopefully you didn’t notice! :P)
changing the theme
whatever I’m missing
I hope I do blog more this year. I enjoy writing down my thoughts and think it’s a great way to improve
your technical writing skills as well as a great outlet when you don’t feel like coding.
Anyways Happy New Year Everyone! All the best in 2013 and happy coding!
Anyone who has worked with me before knows that I am a big advocate of TDD. I find when I start with TDD it’s often hard to move away from it and conversely if I don’t start with it it’s hard to move towards it later.
Lately I’ve been writing several jQuery plugins - both simple and complex. One in particular was a calculation plugin that had dozens of complicated calculations and edge cases. So let’s see how I would go about writing a jQuery plugin using TDD and jasmine as the testing framework for a simplified calculator plugin.
Writing a test
Let’s say we need a function that checks if a number is even. So let’s write the test:
123456789101112131415161718
describe('calculator',function(){describe('isEven()',function(){// What should our test look like ?it('should return true for even numbers',function(){// #1 Add to global namespace?expect(window.isEven(2)).toBe(true);// #2 Add to jQuery namespace?expect($.isEven(2)).toBe(true);// #3 Make plugin add a static jQuery object that has the methods we needexpect($.calculator.isEven(2)).toBe(true);// #4 ??});});});
So what exactly do we want this to look like? Well there are some simple requirements I like to have.
Each plugin should not add anything to the global (window) object (This rules out #1)
Each plugin should only add one object or function to the jQuery namespace (This rules out #2 and #3)
Easily make new functions testable
So that just leaves #4. But what could that be.
Using a global object for tests
The first approach I tried was creating a global object (I know, I know…) before the script was included and add the methods to this object. So let’s write what our test body should look like:
123
it('should return true for even numbers',function(){expect(container.isEven(2)).toBe(true);});
We would change our html test runner to look something like:
12345
<script type="text/javascript">varcontainer={};// adds to global namespace</script><script type="text/javascript"src="calculator.plugin.js"></script>
So what exactly is happening here? Well our unit test is using a global variable to access the internal functions of the jQuery plugin. Next we declare this variable in our test runner so we can access it, but for usage in our application this variable won’t exist. Finally our plugin assigns whatever functions we need to this object. There’s still the problem of possibly having a conflict with the global variable - just one reason why global variables are bad and should be avoided.
Using the plugins jQuery’s data object to store internal functions
A second approach is to utilize the jQuery data object:
12345678910111213141516
(function($){varinternals={}varisEven=internals.isEven=function(num){returnnum%2==0;};$.fn.calculator=function(){returnthis.each(function(){// code// Add internal methods to do data$(this).data('internals',internals);});};})(jQuery);
Our test body would now look like:
12345
varinternals=$('#fakeId').calculator().data('internals');it('should return true for even numbers',function(){expect(internals.isEven(2)).toBe(true);});
This approach meets our requirements and doesn’t utilize a global variable for testing purposes. You can make the argument that if a plugin doesn’t expose the method it does not need to be tested. I don’t fully agree with this because the usage of the plugin API could be considered more of an integration test since we are integrating with our client code (i.e. the HTML page). Sometimes plugins contain logic that should be fully unit testable because there are complicated cases. In this case we are adding an extra step in the plugin but I think the benefits outweigh the overhead.
Returning internals as an option to the plugin
Alternatively instead of adding to each object’s data (not a good idea if plugin is used for several elements on a page) we can do something similar by passing in a string to the plugin that would return the object instead of using the data object. This is the approach I am currently using on a few plugins:
1234567891011121314151617181920212223242526
(function($){varinternals={}varisEven=internals.isEven=function(num){returnnum%2==0;};$.fn.calculator=function(option){if(option==='internals'){returninternals;}// you could simplify this and add options for each method if you prefer like this:// if(option === 'isEven') return isEven;returnthis.each(function(){// code});};})(jQuery);// Test body would be this:varinternals=$('#fakeId').calculator('internals');it('should return true for even numbers',function(){expect(internals.isEven(2)).toBe(true);});
More complicated approach
In larger plugins it might be better to use a CLI tool to build the plugin so that we don’t have the anonymous function wrapper included when testing. For example the jQuery source does something like this. The have an intro file, several body files, and an outro file.
The intro.js file looks like:
12
(function(window,undefined){"use strict";
And here’s the outro.js file:
1
})(window);
They get appended together to build the jQuery source that we know and love. It’s a very useful technique if you’re building a larger plugin or framework.
Conclusion
As with anything there’s so silver bullet. I’m still not completely sure this is the cleanest approach to testing these internal methods, but I’m liking it so far. Allowing access to the internal functions in my unit tests without cluttering up the global window object gives me the flexibility I need to use a complete TDD approach to building jQuery plugins.
If you have any other ways of doing this I would love to hear about them! Happy Coding!
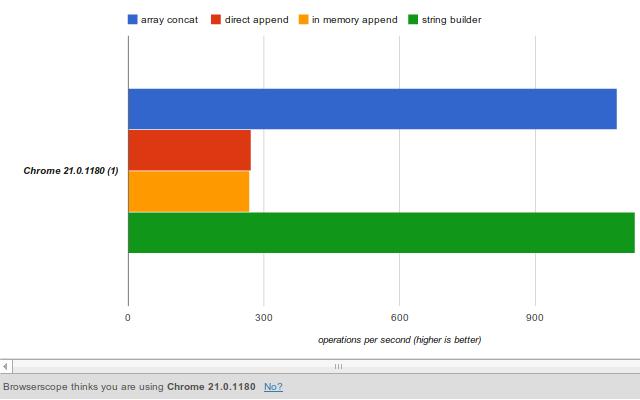
Manually appending lots of items to the DOM is usually a bad idea.
It can cause the browser to repaint the UI which is an expensive operation when the DOM is large.
2) Better Approach - Make changes in memory
Instead of adding items directly to the element in the DOM we can create a stub element in memory and append to that instead. After we are done with the appends we just need to make one call to the DOM to perform the update.
I do believe this result is a result is a little skewed. The DOM I was testing with was quite small and not the size that adding items would make a huge difference. This is something worth noting though because an optimization’s value is highly application specific.
3) Fastest Approach - Use a string buffer and append html string directly
Usually I am happy using the in-memory approach because I know that if you have a large DOM loaded it will minimize the direct updates needed
and hopefully result in better performance. And if the dom is small it’s only marginally slower so I usually caution on the side of err.
But can we make it faster? Well let’s try.
Instead of creating a stub we will just store the html string for each element in an array. This removes the overhead of string concatenation (which is bad of course :)) and the overhead of creating many temporary jQuery elements. When we are finished we will join the items in the array with an empty string and append it to the list item.
Woah! That’s a huge improvement! Granted some of that improvement is because we removed the string concatenation - but it shows you that a few small changes can make a big difference!
Final Thoughts
So there you have it! As a general rule when performing lots of appends to an item it is usually a good idea to not manipulate the DOM directly. And if you want to increase the performance and responsiveness out of you web app when doing DOM manipulation try using the array string buffer technique.
If you have a faster way of doing this, please share! :)
Whenever I code I always prefer to use a dark background theme, like vibrantink or the railscast theme. I just always feel at home with a dark background.
If you’re like me you probably spend a fair amount of time on github viewing open source projects . It’s like a geek toy store - information overload!
And if you’re like me you wish that you could change the source code theme on github to a more familiar theme. Well now you can!
Introducing a little Chrome extension I created called Dark Octo Themes. This extension has one purpose: to show the source code in a modified theme while on github.
Installation
Search for Dark Octo Themes in the Chrome App store. Or if you want to install from source there are instructions on the github repository page here.
First Impressions on Developing for Chrome
This extension was a result of a rainy, bored Sunday and my curiosity to see how simple it would be to implement a chrome extension. The learning curve was fairly low (assuming you are comfortable with javascript) because of how awesome the google docs are.
The docs contain so much useful information and there are several examples of how to use different parts of the API - and they show you exactly which parts of the API are used in the example.
The hardest part (and most time consuming!) was creating the icon and promotional images that are required when you upload to the app store. The experience was very painless though: pay your one time $5 registration fee (I would have paid $20 if I could use a few stock images :P), upload your sources, upload your icon/promotional images, and publish! Done!
Final Thoughts
It really wouldn’t surprise me if github implements the ability to change the source code theme sometime in the not-to-distant future which would render this extension obsolete. Those guys are awesome, and the site just keeps getting better and better by the day it seems. But until then, I’ll be using this selfishly-created :) extension.
If you like this extension or have an idea for an improvement, feel free to let me know!
I’ve been playing around with Node.js lately by building some prototypes. I’ve been using express as my web framework and have really enjoyed the experience so far.
One thing that I do miss from Rails is to be able to easily map a controller’s CRUD actions to the conventional matching routes. Learn more about rails routing here if you are not familiar.
Let’s say you have a “task” controller with all seven mappable actions defined. In rails you would do something like this:
1
resources:tasks
In express it appears that you would have to do this manually. Inside your app.js file you would have the following code:
When experimenting with node and express I had to do the following for a couple of different controllers and duplication started to creep into my code. I’m a strong believer in the DRY principle and I even apply that when learning a new language or framework. Even when experimenting with new technology applying the DRY pinciple allows you to solve an actual problem and look into the language/framework instead of working at a “hello world” level. I find solving an actual problem speeds up the learning curve and in the end is also more fun. Maybe that’s a post for a future date :).
Anyways to emulate the rails routing behavior in express I’ve created a quick helper that can be used. It is called “autoresources” and can map a controller’s actions just like rails does.
Side note: I’m hesitant to call the express “routing handlers” controllers in the way that rails calls their controllers controllers, but for this post we’ll treat them as the same. And actions and functions will be interchangeable.
The call to resources.map() will look for the file “APP_HOME/routes/tasks.js” and then check for functions that can be auto mapped to routes. Only functions that exist in your controller will be auto mapped. For example if you don’t have a destroy function in your controller then no route will be added for destroy.
Your route handler should look something like this:
The map function also returns the javascript exports for that file. The exports can be used the same way just as if you did a “require” on the file yourself.
For example, let’s say our tasks.js file had another function called “recent” to show the recent tasks that need to be completed. In our app.js file we would then do the following:
I might add this as a node package in the next few days but for now you can grab the source code for this at my github page. To use this code just copy it (it’s just one file) to your project directly. Then just require it from your app.js file
12
// Change the path to wherever you copied your filevarresources=require('./utils/autoresources.js')
Hopefully this will be useful for some people out there. I will probably have more to talk about with node in the next few months since I am finding it to very interesting and fun to work with. Remember how much fun you had when you first discovered rails?
Recently I decided to cross to the dark side (or see the light, depending on whom you ask!) and start using vim. I’m just finishing up a month long challenge using vim for any file editing outside of Visual Studio - so far it’s working out extremely well and I am going to continue using all the almighty one that is vim!
One problem I had during this learning experience is that my .vimrc file was starting to grow and I had to maintain different versions across different boxes - especially since every day I was (and am) changing something in my .vimrc file. I have a .vimrc file for my work PC, my home PC (Windows + Linux), and my home laptop (Linux). I also had the same problem sharing my .bashrc files across these machines. On windows I use cygwin as my command line shell. I will talk about how to set this up on a Linux environment, not on plain windows.
The first thing I would recommend is storing your configuration files on github. This way you can clone these files from any computer you like. And if when your amazingly fast SSD crashes or your computer just blows up you don’t have to start from scratch.
Once you have a folder (I keep them in ~/configs) for your configurations you can use symbolic links to easily link the location of the files inside your repository. Go to your home folder and type the following commands:
1
ln -s ~/configs/.bashrc .bashrc
1
ln -s ~/configs/.vimrc .vimrc
Change “~/configs” to wherever your local git repository is located. This will link the files needed by bash and vim to load the config files from your repository. Running bash or vim should have the correct configurations as you expect. You might need to delete the original .bashrc and .vimrc inside your home folder. By careful that you don’t have anything in these files that you haven’t added to git.
When you change your .bashrc or .vimrc file on one machine you can commit and push them to github and just pull them from your other boxes. Easy peasy! This also allows you to add comments to your commit so you can easily remember what and why you have made the change. And next year when you buy a new laptop getting back to speed with your command line and vim configurations is as easy as checking out your repository and creating the symbolic links again. You could always create a new computer script that does all this for you and store that in github. But I’ll leave that as an exercise for the reader :).
Since lots of vim plugins use github you could experiment using git submodules (if you dare!) to maintain the plugins you use for vim. This way when you update your sources on one machine it will grab any third party vim plugins that you use - instead of installing those manually. Hopefully everyone is using pathogen to maintain vim plugins? :) If you have an awesome’er way of maintaining your config files or vim plugins please let me know!
Today I was helping out a co-worker with a git problem and when I looked at the branches in his repository (using “git status -a”) I didn’t see what I expected. There were dozens and dozens of remote tracking branches in his repository that shouldn’t have been there. All the branches that the team had developed in the last year still existed locally (as tracking branches) even though they had been deleted remotely by another developer. So I showed him the following git command:
1
git remote prune origin
This will delete any remote tracking branches that have been deleted in the remote repository (if your remote name is different replace “origin” with your remote name).
As a result “git status -a” now shows what I expect on my co-worker’s machine. This is a great little command when you work with a repository that has many remote feature branches created and deleted on a regular basis. I usually run the command every few weeks but it really only needs to be run when you think you think your git closet needs a little _declutter_ing . The syntax is a little cryptic, so it’s a good idea to alias it!